A basic tutorial on how
to make a reflection as if being cast onto a newly polished floor.
Which images work, which images don’t.
Reflections are usually
added to an image that has a plain white background. For this tutorial, we will
use this lovely picture of a banana.
It has a nice white background that will make the banana easy to mask out.
Which brings us to our next step, masking..
Masking
Now lets mask the
banana. Use whatever method you normally do, and save the selection or the
mask. If you used the pen tool right click, and make a selection.
Then on a new layer select/inverse and fill it with white.
Now we have a nice, shadowless `nanner.
Flatten the image.
Duplicating the Image
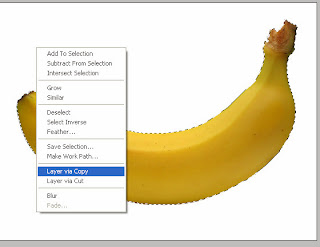
Lets duplicate the
banana by using the magic wand and selecting the white part.
Right click>layer via copy.
Right click>layer via copy.
Resizing the canvas.
Now lets resize our
canvas to make room for the reflection.
Go to Image>Canvas Size and increase the vertical size. For this banana, I think we'll use a height of 29.667
Go to Image>Canvas Size and increase the vertical size. For this banana, I think we'll use a height of 29.667
Link your two layers. In CS2 you simply shift-select both of your layers in the layer palette, but in older versions, you select the first and click in the chain box icon of the second.
Now move these two to the top.
Transforming
the reflection
Now would be another
good time to save.
Make a new layer, and fill it with white, then place it at the very bottom.
If you haven't already, unlink your layers.
Next, we are going to flip the second banana layer vertically. So go to Edit>Transform>Flip Vertical .
Now, move the reflected banana underneath the main one, get it as close as possible without overlapping.
Then select the transparent parts of the layer with the magic wand tool, then go to select>inverse.
The Fun Part. Kinda.
With the banana
selected, make a new layer; place it on top of the reflected banana layer.
Choose the gradient tool, and make sure that your background/foreground colors are black and white.
Check the "reverse" box.
Make a new layer, and drag the gradient tool from the top of your selection to the bottom.
Choose the gradient tool, and make sure that your background/foreground colors are black and white.
Check the "reverse" box.
Make a new layer, and drag the gradient tool from the top of your selection to the bottom.
Now set the blend mode to screen and lower the opacity to 80% or so.
Deselect and we have a pretty decent reflection.
Deselect and we have a pretty decent reflection.
Finishing touches
For a finishing touch
lets merge the gradient layer and the reflected banana layer.
Next take a very soft, big eraser brush with opacity of about 40% and make a gentle stroke at the bottom of the layer, to create a better fading effect. Hold shift if you have trouble drawing a straight line.
And we are done!
We did it!
Your final result should now look like this.
Next take a very soft, big eraser brush with opacity of about 40% and make a gentle stroke at the bottom of the layer, to create a better fading effect. Hold shift if you have trouble drawing a straight line.
And we are done!
We did it!
Your final result should now look like this.


